Monday, July 5, 2010

I miss my IPod

Today after work I  stayed downtown for a while to see one of my favourite Edmonton bands, Yes Nice!, play at The Works art festival in Churchill Square.  I have been a fan of theirs ever since I first heard them live a few years ago.  They are a really fun and energetic band who are a real treat to see live.  I think their music is also somewhat inspired by Christianity and The Bible (at one point I attended the same church as a couple of the band members as well).

At one show I bought a couple of their CDs and loaded them onto my IPod so i could enjoy them all the time… if I wished to.  But alas, I can’t seem to find my IPod!!!  I lost it somewhere a few weeks ago and have no idea where it might be.  I hope it is somewhere in my bedroom.  If it’s been stolen or picked up by someone I hope they are enjoying my awesome tunes!

Saturday, June 26, 2010

Yam Samosas

1006211446001 In May I began working as a kitchen helper at an Indian restaurant called Karma located in downtown Edmonton on 99th Ave. between 105th st. and 106th st..  Usually my day includes washing dishes, cleaning, and prep cooking.  And by prep cooking I mean chopping, grating, and peeling veggies.  Mostly it is just potatoes.  

Anyway, while I am doing these things I am also watching to see how the pros cook and bake, how they do it and what they use.  I ask question like, “What is in this?”  or “How do you get it to turn out like that?”  I am quite sure they know I am interested in cooking and baking and really appreciate my presence in the kitchen;  they know that I am more than just a dishwasher.  Lately I have been asked to do more advanced prep work and also helping with catering functions outside the kitchen.  Who knows? maybe one day I will move out of the dish pit entirely. 

But I think it will be very challenging for me to be a cook at Karma because of the language barrier.  They all speak English, but it is hard for me to understand them and I always need things repeated to me.  Sometimes I wonder if they are talking about me, joking about me, in Indian.  Maybe I am just paranoid.  

Over the past few weeks I have been observing the work my co-worker Karan who is the baker in the restaurant.  He makes all the dough for the na’an bread and the samosas,  he also most often bakes the bread and meats in the tandoor (a cylindrical clay oven).  I have watched and asked questions about his samosas so that I could try it out at home.  The following recipe is my own twist on this most loved of Indian foods.  Unfourtunately,  I forgot to take a picture of the finished product :(  But the picture of the two above are the ones that turned out great.  I took a bunch to a potluck and people liked them.


Yam Samosas

Filling

3 Large Yams; boiled, peeled and grated

2 C. whole corn kernels

1 tbsp butter

3 tbsp brown sugar

Wrapping

4 C. white flour

1 C. water

¼ C. oil

2 tbsp sugar

1 tsp salt

1 tbsp Oregano

Filling

1. Boil yams in water till you are able to pierce them with a fork. Remove them from the water and let them cool. Peel the yams and then grate them; if they are too mushy to grate they may be mashed instead. 3 large yams should make about 3 cups.

1006211051000

2. Boil the whole corn kernels till they are done.

3. Mix together grated yams, corn, butter and brown sugar.

1006211336000

Wrapping

4. In a large bowl mix flour, oil, sugar, salt, and oregano.

5. Add water gradually till you are able to form a ball of dough. Add additional flour or water as needed to make the dough workable.

6. Shape the dough into a cylinder roughly 3” in diameter and about 14” long. At this point the dough may be wrapped in plastic and stored in the fridge for later use.
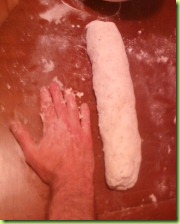
1006211212000

7. Cut a 1 1/2” section off of the dough cylinder and roll it out into a thin circle. Cut the circle in half making two half circles. (NOTE: the samosas in these pictures used a 2” section which was too large.  I suggest 1 1/2” or maybe even 1” sections).

8. Shape the half circle into a cone and fill it with the filling, leaving enough space to close the wrapping. After the first fold moisten the edge with some water so that the second fold sticks to the edge.

1006211404000 1006211404001

1006211344000 1006211412000

9. Place each samosa on a well floured tray spaced evenly apart from the other samosas (It gets messy if they start to stick to each other).  Repeat till all of the filling or dough is used up.

Tuesday, June 8, 2010

More Swirly Goodness


Last Friday my friend and fellow avid baker Nicole came over to bake some loaves with me. We were both intrigued at how my last swirly bread turned out and wanted to try something more dramatic... White and Chocolate Swirl Bread.
We used a basic white bread recipe and a chocolate loaf recipe that I found on someone else's blog ( http://familynature.wordpress.com/2009/04/21/chocolate-loaf-this-is-something-everyone-should-try/ ). There are many recipes for chocolate bread and many ways to mix chocolate in with bread. some, like this one, are actual loaves of bread with cocoa in them. Others use chocolate pastes, sauces, or chips to create more of a dessert bread. We chose this particular recipe because it was very similar to the recipe we were using for the white bread. The procedure and ingredients were similar. This made for a simple and fun bread making experience that produced some great breads.
We ended up making a few different items. First we made two loaves of White and Chocolate Swirl Bread. The pattern turned out great and the texture between the two breads were consistent. It was awesome to see the contrast in colour between the white and chocolate breads swirlled together. Also, the cocoa in the chocolate bread was good enough to produce the lasting and delicious smell and taste of chocolate, yum!
After these two loaves we had so much leftover dough that we could have made a third loaf, but decided to split the dough and make a few other creations! Nicole made a bunch of cinnamon buns while I made a strudel using some leftover cherry filling I had in the fridge. These two creations were of course marbled with white and chocolate bread.
I look forward to more times when I can bake with and for my friends, it is a joy to share this experience with others.

Saturday, May 29, 2010

Swirly White and Green Bread

Green and White!

Swirly!

Nice Shape!

Marbled Buns!

I wanted to try a different technique to the way I normally make a bread loaf. I found a book at a public library book sale called 'Artisan Baking Across America' by Maggie Glezer. This book has been very helpful in showing me some new techniques and also stories about various bakers and bakeries across North America. Normally I would just place the risen bread dough into the loaf pan without shaping it much before baking it. Instead I first flattened the dough out (after it had risen for an hour) into a large rectangle folded the dough so it was the length of the pan, then finally rolled it up. The result was a loaf that was quite uniform and familiar to a loaf that I would buy at the grocery store for making regular sandwiches.

Of course I just had to add a twist to the recipe! For quite awhile now I have been considering a bag of pea flour that I saw at the grocery store and what it would be like to use it for bread making. I imagined since the flour was green in colour, the bread would also be green in colour. But after reading the label I had the feeling it would not be as green as I was imagining it to be. So I also bought some green food dye to be on the safe side!

I followed a white bread recipe but included the pea flour and green food dye into half of the recipe. It was neat to work with dough that had such an unusual colour. After folding up the white and green doughs according to the length of the loaf pan I placed the green dough on top of the white dough. Then I trimmed the edges to produce a long rectangles that fit over each other perfectly. Once rolled it produces a nice swirly pattern with a green centre. With the leftover dough from trimming I made several small marbled buns.
Note: I don't have any pictures of the bread after it was sliced because I can't seem to find my card reader. But I assure you, it is quite white green and swirly!

Wednesday, May 12, 2010

Adventures in bread making.


A couple of months ago I was very fortunate to find an automatic bread maker sitting next to a dumpster next to a mattress and a few old TVs. I decided to take the brad maker home and was thrilled to see that it worked great! I had made pies and cakes before so making bread seemed like a good idea.
I found a bread machine recipe book at the library and started to make various types of bread and dough. I started simple by making a loaf of whole wheat bread. It turned out pretty good, but a little short. Some other loaves I tried can out really short, heavy/dense. I learned that I needed to adjust the recipes to account for the levels of elevation and humidity which affects how well the yeast will work. Edmonton is a fairly dry area and an elevation of 668 m above sea level. I solved my problem by adding more water and slightly more yeast than what the recipe called for. Some loaves had too much yeast and exploded out of the machine, but eventually I found the right balance.

I found the bread maker easy to use. Most recipes just needed me to add the ingredients in a certain order (ususally liquids then solids, then yeast last) turn the machine on with the right settings and wait, or even forget, for a few hours.

Bread loaves were OK but I wanted more. So I started to make crescent rolls. They took the same amount of time but more effort on my part. I made the dough in the machine then let it rise a bit, shape it, rise some more and bake them. More work, but they tasted amazing! Next batch I made, I added a layer of Alfredo pesto that my roommate had made for a pasta dish and had leftovers of. Yum yum yum.

The next step for me was to make bread without the machine using a recipe I got from a friend. It's allot more enjoyable because of all the mixing that kneads to be done (pun totally intended!) and also getting the yeast just right. I love the shapes of the loaves handmade bread can produce. Bread is not meant to have a hole in the bottom of it! My first attempt produced two short loaves, but I am excited to keep trying, and see what I can make.

Wednesday, April 21, 2010

Eggplant Dishes Part 2


Asparagus Eggplant Wraps on white rice with a bun.
For the second part of my eggplant dishes I would like to present a dish that was inspired by a trip to the Granville Island Market that I took with some family members over the Christmas holidays. At the market one of the food vendors was selling a piece of feta cheese that was wrapped in a slice of grilled eggplant and held together with a toothpick. I tried it and was intrigued.

Last week I finally decided to do something similar. I like to use ingredients that I have at the house, and I didn't have any feta so I needed to improvise. My room mate had boiled a bunch of asparagus spears for his dinner but did not eat them all and let me use some to try out a new dish. I would like to present this dish simply as, 'Asparagus Eggplant Wraps'

Asparagus Eggplant Wraps

5 to 10 asparagus spears, boiled
1 small eggplant sliced thinly length-wise
1/4 C BBQ sauce (or marinade of your choice)
1 C shredded cheese

Note: The amount of all of these ingredients depends on how well you can slice the eggplant. If you can make lots of good slices then you can make lots of good wraps! If they are too thick or too thin they will not work as well.

1. Slice the eggplant length-wise, not too thin that it can't wrap or too thin that it falls apart.

2. Layer the marinade with the eggplant slices so that the eggplant slices can absorb the flavor. Let it sit for a few hours.

Marinade

3. Fry the eggplant slices in a frying pan until they are not covered in wet sauce anymore.

Fry
4. Remove the eggplant slices from the frying pan and onto a cutting board. Cover one side of each slice with cheese, then place the asparagus spear near the end of the slice. I like to place the spear so there is a bit of shaft before the eggplant, then cut the bottom of the shaft off so there is equal amount of asparagus on each side of the eggplant.

Wrap
5. When an asparagus spear is wrapped, impale it on a skewer; place about 5 wraps on each skewer. If you can, balance each skewer on the edges of an oven pan so that none of the wraps are touching the pan. Broil in the oven till the cheese is melted and begins to harden.

Broil
Again, I must stress that the amount you can make depends on how well you can slice the eggplant. But I believe it is possible to get 10 or even 12 wraps out of an eggplant. Good luck and enjoy!

Tuesday, April 13, 2010

Eggplant Dishes Part 1


So lately I have been trying some new things with eggplants that have turned out quite well. On its own I find eggplant to be a bit bland but is quite tasty when added to other kinds of foods and flavours. The first dish I would like to share is 'Yam/Rice Casserole' I'm not sure if casserole is the right word for this dish, but it feels right, so I'll go with it.


Yam/Rice Casserole


1 Yam (cubed)

2/3 C. Rice (1 1/3 C. Water)

1 Small Eggplant (sliced)

3 tbsp. Hoisin Sauce

2/3 C. Shredded Cheese

Desired Seasonings.

1. Wash Rice before cooking it. Cook rice and water in a small pot. when the rice begins to boil, cover and simmer for 15 minutes or until all the water has evaporated.

2. Boil the cubed yam until you are able to mash it with a fork.

3. While the rice and yam cubes are cooking, fry up the eggplant slices and season as desired.

4. In a small mixing bowl blend the yam with a hand blender until smooth

5. add the mashed yam to the rice, mix thoroughly.

6. Put the yam rice mixture in a small oven safe pan (such as a loaf pan) spread the hoisin sauce on top then layer with the fried eggplant slices. Cover with shredded cheese.

7. Bake in the oven (400 F) until the cheese is completely melted.

Makes 2-3 servings.